Recipes

Great Steak!

Alright, we are in the dog days of summer, and things are heating up outside and on the grill. So let’s talk steak.

First things first, start with a good piece of meat: New York, filet, or rib-eye would be perfect! Something nice and thick.

About 30 minutes before you grill, take the steak out of the refrigerator and let it sit at room temp. This will help you get a good, even cook once it hits the heat.

Be sure to pre-heat your grill to high. Lightly rub your steaks with a little olive oil, and sprinkle with my Dish D’Lish French Seasoning Salt (this is so delicious on steak!), or sea salt, fresh cracked pepper, and some smoked paprika. Or if you want to try something really different, our new Dish D’Lish Rain City Seasoning has Caffé Umbria Coffee in it and Theo’s Coco Nibs. It’s super savory, dark and delicious on steaks!

RainCitySeasoning 3

Place the steaks on the grill and cook until nicely marked on the first side. Leave it be now – don’t move them around!

Then turn over and cook on the other side. Depending upon your steaks thickness will depend upon how long to cook it.

Remember the meat will continue to cook a bit after removing from the grill. And you can always put it back on for more heat; you just can’t go back the other way!

Serve topped with a simple to make herb garlic and blue cheese butter, your family’s favorite local veggies, and an ice cold local brew.

CPK Steak
This is a photo of the delicious Grilled Rib Eye
with Red Wine Salt and Blue Cheese Butter on California Pizza Kitchen’s new menu!

So get the grill ready, it’s time for some mouth-watering steaks! –Kathy

Blue Cheese Herb Butter
This is a big bold flavored butter so a little dab will do ya!
You can freeze any leftover or use on grilled veggies too!

Makes about 1 cup

6 Tbsp. butter, softened
1/2 cup blue cheese crumbles
1 Tbsp. minced fresh garlic
1 tsp. Worcestershire sauce
1/2 tsp hot sauce
1 tsp. Dijon mustard
1/2 tsp. kosher salt
1/4 tsp. black pepper
1/4 cup thinly sliced green onions
1 Tbsp. chopped fresh thyme
2 Tbsp. chopped fresh basil or 2 tsp. finely chopped fresh rosemary

Whip the butter, cheese, garlic, hot sauce, mustard, salt, and pepper together until smooth. Then add the green onions and herbs. Mix until well incorporated.
Refrigerate until needed. Bring to room temperature before smearing on grilled steaks, or veggies.

Recipe by Kathy Casey Food Studios® – www.KathyCasey.com

Crazy for Corn

For me, nothing says summer like fresh corn on the cob. Personally, I love my corn with just a bit of seasoning, but naked is just fine by me! A little smear of butter is the perfect complement to hot corn on the cob.

Put on your thinking caps; it’s time to get creative. Try whipping in a bit of local honey with chili powder (like in my Honey Butter recipe below) or combine fresh basil, roasted garlic and some finely grated cheddar cheese. The combinations are endless!

More commonly boiled or steamed, corn is also amazing done on the grill. If you’ve already got your grill turned on for a sizzling summer barbeque, throw your corn on, too. Leave the stem on for an easy handle and roll it along the grill just enough to heat it through and get some great color on it.

Serve it just like that, or cut off the kernels for my Summer Roasted Pepper, Corn, and Arugula Salad. Other options are to add the kernels to fresh salsa, folded into a chopped veggie salad, or in your favorite potato salad with some roasted hot peppers.

Speaking of cutting off the kernels, I have a great trick to share with you; if you have a bundt pan. Insert the corn into the center hole and carefully cut downwards as close to the cob as you can, without cutting into the cob. The bundt pan will catch all the kernels for you. If you don’t have one, just hold the corn vertically, making sure the tip is firmly in place and cut downwards.


Photo from Simply Recipes

So go enjoy one of the best tastes of summer while you can – fresh-picked, local corn! –Kathy

Grilled Corn on the Cob with Honey Butter

Pull back the husks and pull out the silk, then tie off the husks with a strip of husk. This makes for a decorative and very useful handle.

Makes 8 servings.

8 whole ears fresh corn

Honey Butter
1 stick (1/4 lb.) butter
2 Tbsp. local honey, such as my “5130” Honey
2 tsp. Tabasco or hot sauce (more or less if desired)
2 Tbsp. coarse chopped Italian parsley

Dish D’Lish French Seasoning Salt – or sea salt
fresh lime wedges

Peel back corn husks and pull out corn silk. Heat barbecue coals or wood fire.

Meanwhile, in a mixer whip the butter, honey, Tabasco and parsley together until fluffy.

When coals are hot, place corn on grill and cook, turning every few minutes. Cook until corn is lightly charred and cooked through. Spread corn with Honey Butter and sprinkle with seasoning.

Recipe by Kathy Casey Food Studios® – www.KathyCasey.com

Summer Roasted Pepper, Corn and Arugula Salad with Goat Cheese Crostini
Makes 6 servings

1 green bell pepper
1 red bell pepper
1 yellow bell pepper
3 ears fresh corn, husked
2 tsp. Dijon mustard
1 clove garlic, minced
3 Tbsp. balsamic vinegar
2 tsp. fresh lemon juice
1/4 cup extra-virgin olive oil
3/4 tsp. kosher salt
Freshly ground black pepper to taste
1/4 cup chopped fresh basil
—————————————
12 thin slices (1/4-inch) of French bread baguette, lightly toasted
6 oz soft chevre goat cheese
—————————————
4 to 6 cups baby arugula

Roast peppers over a hot grill or coals or under the broiler, turning often until skin is totally blistered. Peel, seed and thinly slice peppers. Set aside.

Grill corn, turning when each side is marked and lightly roasted. Cut corn from cob, and add to peppers.

In a large bowl, whisk mustard, garlic, vinegar and lemon juice together. Slowly whisk in oil. Season with salt and pepper, and toss in basil, roasted peppers, and corn. Set aside.

Meanwhile, spread toasted French bread slices with goat cheese, and heat in the oven or on the grill until just warmed and toasty.

Add arugula to roasted pepper mixture. Toss well. Divide among individual salad plates and garnish with the warm goat cheese crostini.

Recipe by Kathy Casey Food Studios® – www.KathyCasey.com

Posted by Kathy on July 21st, 2016  |  Comments Off on Crazy for Corn |  Posted in Dish D'Lish, Dishing with Kathy Casey Blog, French Seasoning Salt, garlic, herbs, Kathy Casey, KOMO Radio, other, Products, Recent Posts, Recipes, salads, seasonings

D’Lish Ice Cream

From big bowls of creamy ice cream and refreshing fruity sorbets to gelatos and all-American ice cream sandwiches, frozen treats have long been a favorite for kids of all ages. And making homemade ice cream couldn’t be easier these days. Ice cream makers are super affordable and it’s a fun activity for everyone.

The best part? You can literally go wild with custom flavors. Love a ginger and pineapple flavor combo – then go for it! Want a dairy-free alternative? Try making it with coconut or almond milks! With my basic recipe for a Sour Cream Ice Cream Base, you can add in any of your backyard bounty from fruits to herbs. Get creative!

If the mint in your yard is taking over the garden like mine is, then whip up a batch of Homemade Chocolate Chip Mint Ice Cream with easy to make lush chocolate inclusions to fold in – yum! So pretty and tasty served in little frozen glasses topped with a fresh mint sprig!

But maybe making ice cream is just too much. Well never fear! Head to the freezer isle of your local grocery store and try out some of these speed scratch ideas.

Just soften ice cream and stir in the goodies then re-freeze:

    Chocolate Pretzel Swirl – chocolate ice cream, crushed pretzels, chopped chocolate bars and toasted walnuts.
    All-American Pie Mash-Up – vanilla ice cream, cherry pie (crust and all)

So get that ice cream maker churning and celebrate summer the old fashioned way – Yum! –Kathy


Photo from Kathy Casey’s Northwest Table.


Fresh Mint Ice Cream with Chocolate Mint Candies

I like to serve this garnished with a bit more chopped mint candy and a fresh sprig of mint.

Makes about 4 cups

4 cups heavy whipping cream
3/4 cup sugar
1 1/2 cups packed mint sprigs, plus 2 tablespoons finely chopped fresh mint
6 egg yolks
1 cup coarsely chopped Chocolate Mint Candies (recipe follows) or Frango Mint candies

Combine the cream and sugar in a large, heavy saucepan. Tear the mint sprigs (to bruise them) and add to the cream mixture. Bring to a slow simmer over medium heat.

In a bowl, whisk the egg yolks, then gradually whisk in about 1 cup of the hot cream mixture. Whisk the egg mixture into the cream. Whisking constantly, bring to a bare simmer and cook for about 30 seconds. Remove from the heat and whisk frequently to cool to room temperature. Refrigerate for at least 2 hours.

Strain the mixture and discard the mint leaves. Stir in the chopped mint, then pour into an ice cream maker and freeze according to manufacturer’s instructions. Just before the ice cream is finished, stir in the chopped candies. Transfer the ice cream to a plastic container and freeze until ready to serve.

Chocolate Mint Candies
Makes 24 nice-sized pieces, or enough for 1 recipe of ice cream plus 12 extra pieces of candy

12 ounces bittersweet chocolate, chopped
6 Tbsp. butter
1/2 tsp. salt
1/2 tsp. peppermint extract
1/2 cup confectioners’ sugar

In a medium bowl or double boiler, melt the chocolate, butter, salt, and extract together over a pan of barely simmering water, whisking until the chocolate is just melted. Remove from the heat, sift in the confectioners’ sugar, then stir to combine well. Spread the mixture in an 8-inch square baking pan.

Let cool at room temperature for at least 4 hours, or refrigerate to harden faster.

To remove the candy from the pan, invert the pan onto a piece of plastic wrap or a cutting board, lay a hot towel over the pan bottom for about 1 minute, then tap the bottom of the pan. Loosen the candy with a spatula if needed. Cut the candy into 24 pieces to serve as candy, or coarsely chop to use in ice cream. Store refrigerated for up to 2 weeks.

Recipe from Kathy Casey’s Northwest Table.

Sour Cream Ice Cream Base
This recipe is a great base to incorporate in any fresh summer fruit.

Makes about 5 1/2 cups.

1 1/2 cups, fresh fruit (such as peaches, berries, cherries)
1/4 tsp. cinnamon (optional)
3/4 cup sugar
1 cup half & half
1 cup cream
1 cup sour cream
1/2 cup chopped walnuts, lightly toasted (or other nuts – optional)

Place fruit, spices, sugar and half & half in a blender. Process until fruit is broken down but some chunks still remain.

Place fruit mixture in a large bowl. Whisk in cream and sour cream until smooth. Chill mixture for at least 30 minutes.

Place cream mixture in ice cream maker and freeze according to manufacturer’s directions. When mixture is frozen, fold in the walnuts if using.

Recipe by Kathy Casey Food Studios® – www.KathyCasey.com

Posted by Kathy on July 7th, 2016  |  Comments Off on D’Lish Ice Cream |  Posted in Books to Cook, dessert, Dishing with Kathy Casey Blog, Kathy Casey, KOMO Radio, Recent Posts, Recipes

Summer Cherries

From Bings to Queen Annes, cherries are one of the Northwest’s most famed exports, and also one of our most valuable crops. Needless to say, they’re luscious, sweet & tart, and decadent.

Cherry Mojitos for a Crowd
Cherry Mojito photo from Kathy Casey’s Northwest Table.

Eaten out of hand is always tasty but I love them crushed in fresh lemonade or in one of my favorite summer cocktails, Cherry Mojitos for a Crowd! Just combine pitted cherries, light rum, fresh squeezed lime juice, and simple syrup. Let this sit for an hour or so, and then add a big splash of soda water and ice. Now, you’re ready for summer sippin’!

Have you ever made cherry salsa? Make my Sassy Bing Cherry Salsa just like you would tomato salsa, but sub out fresh chopped cherries for the tomatoes. Toss with some fresh lime juice, fresh minced jalapeno, a little red onion and some cilantro–great on grilled chicken or salmon.

Or hey, how about just a big bowl of cherries for dinner? Why not! So head out to the market and pick of a big bag of fresh local cherries and taste the season! –Kathy

Cherry Mojitos for a Crowd
Makes about 10 servings

3 cups pitted fresh sweet cherries (about 1 1/2 pounds)
1 bunch fresh mint (about 1 1/2 cups sprigs)
3 cups silver rum
2 cups sugar
2 cups fresh lime juice
———————————————–
10-ounce bottles soda water, chilled
Loads of ice for serving

For Garnishing: fresh mint, fresh cherries

In a large nonreactive container, such as a glass pitcher, lightly crush the cherries with a potato masher. Then add the mint, rum, sugar and lime juice. Stir well to dissolve the sugar. Cover and refrigerate at least 2 hours – or overnight. (You can remove the mint before serving if you like and then garnish with fresh ones.)

For serving: add the soda water to the pitcher of drinks. Add ice and serve immediately.

Recipe by Kathy Casey Liquid Kitchen® – www.LiquidKitchen.com

Posted by Kathy on June 24th, 2016  |  Comments Off on Summer Cherries |  Posted in Books to Cook, Cocktails, Dishing with Kathy Casey Blog, Fruit, Recipes

Cider Sipping

It was not long ago that ciders were far and few between, but now, ciders are popping up everywhere across the country. From dry, tiny bubble-style (like a fine French Champagne) to spiced, and fruit-forward (think pear or raspberry, and even chai). There’s something for everyone’s taste.


A Rhuby Rum Cider Cocktail featuring dark rum,
grapefruit and pomegranate juices, and chai cider!
Photo by Kathy Casey Liquid Kitchen®

Cider is also fantastic as a mixer for cocktails too! Cider cocktails are a growing trend in bars and restaurants, and I have had so much fun creating new cider twists. For instance, have you ever had a mojito with a splash of crisp dry cider instead of the usual soda water? Or how about a whiskey sour topped with a blackberry cider.

Ciders are just the thing for sunny weather sipping. Friends and family gather for picnics, and patio parties – all of which call for cocktails batched for a crowd. One of my favorites is sangria, like in my Pear & Blackberry Sangria! It is so delicious to make this time of year with all the great fruit that is coming to their peak. Grab a local cider at the farmers market, add in a little light rum, and then sliced seasonal fruits. If it needs a bit of sweetness add a touch of local honey. Let it sit overnight to infuse in the refrigerator, then fill up a big pitcher and bring it out on the deck for leisurely sipping in style!

Cheers to summer with some sunny ciders. And for more inspired sipping, make sure to check out my Spiked column in CIDERCRAFT Magazine! –Kathy

Pear & Blackberry Sangria
Blackberries can be switched out for raspberries or strawberries depending upon what’s peak of season at your local market.

Makes about 4-6 servings

1/4 cup water
2 Tbsp. fresh lemon juice
1/2 cup blackberries
—————————
1 1/2 – 2 Tbsp. blackberry honey
2 Tbsp. fresh orange juice
2 Tbsp. brandy or cognac
—————————
1 (22 oz) bottles Crispin Natural Hard Pear Cider Lion Belge
Garnish: fresh blackberries and sliced pear

In a blender cup combine the water, lemon juice and blackberries. Process until smooth. Then strain through a fine mesh strainer and discard solids. Add the honey, orange juice and brandy and stir until honey is dissolved. Refrigerate for up to 2 days.

When ready to serve combine the blackberry mixture with the chilled cider in a large container. Add the berries and pear. Serve over ice

Recipe by Kathy Casey Liquid Kitchen® – www.LiquidKitchen.com

Posted by Kathy on June 2nd, 2016  |  Comments Off on Cider Sipping |  Posted in Cocktails, Dishing with Kathy Casey Blog, Kathy Casey, KOMO Radio, Lifestyle, Recipes

Local Salmon The Big Kings Are Coming In!

Nothing says Pacific Northwest like salmon, and it’s that time of year again when this rich, delicious local gem is readily available. Bring on the summer sun, its salmon-cooking season!


D’lish Salmon!
(Photo courtesy of Alaska Seafood Marketing)

There are several varieties of salmon available locally that can fit any budget and taste, from sockeye to King. Salmon’s natural oil and fat content help keep it moist and tender, even when grilling, but you can help it stay that way with a flavorful brine.

Brining possibilities are endless: white wine and savory spices, brown sugar and soy, or simply sugar and salt brine – just dunk your pieces for 15 minutes or so before cooking.

Salmon makes the perfect platform for glazes, marinades and other tasty toppings. How does roasted king salmon with a Chipotle Honey Glaze or an Orange Ginger Butter sound? Or contrast salmon’s rich meatiness with a fresh and zesty Zesty Lemon Basil Vinaigrette. Makes me want to fire up the BBQ right now!

So whether you’re smoking, grilling, or oven-roasting it, get your wild salmon on while it’s in season.
–Kathy

Chipotle Honey Glaze
Make a generous 1/2 cup

1/2 cup local honey
3 Tbsp. puréed chipotle peppers in adobo sauce*

Stir together in a small bowl until well combined. Store refrigerated for up to 2 weeks.

*To make chipotle purée: Purée a can of chipotle peppers in adobo sauce with a hand blender, blender or food processor until smooth. Freeze any remaining purée for another use.

Recipe created for Alaska Seafood Marketing by Kathy Casey Food Studios®

Orange Ginger Butter
Switch this basic recipe up with different combinations of citrus and herbs. Change out the ginger for garlic and try using a different mustard as well. Roll up different variations into logs in plastic wrap and freeze for up to 4 months. Just slice off a few pieces for a salmon topping anytime.

Makes 1 cup

8 Tbsp. (1 stick) salted butter, softened, cut into chunks
1 1/2 tsp. Dijon mustard
3 Tbsp. orange juice concentrate
1 Tbsp. finely minced orange zest
1 Tbsp. finely minced ginger
1/4 tsp. salt
2 green onions, very thinly sliced

Place all ingredients except the green onion in a food processor. Process until smooth and emulsified, scraping down the sides of the work bowl often. (If the butter doesn’t come together right away, be patient and continue processing.) When the mixture is well blended, add the green onion and pulse until mixed. Keep refrigerated, tightly covered, for up to 7 days.

Recipe created for Alaska Seafood Marketing by Kathy Casey Food Studios®

Zesty Lemon Basil Vinaigrette
This quick and easy homemade dressing is delicious drizzled over salmon. You can switch up this basic vinaigrette recipe by changing out the basil for cilantro and the lemon for lime, and/or adding a dash of hot sauce for some zing. You can also double the recipe and add all the ingredients at once to a blender to make a more creamy dressing.

Makes 1 cup

2 cups fresh lemon juice
2 Tbsp. local honey
2 Tbsp. Dijon mustard
1 tsp. finely minced fresh garlic
1/2 cup olive oil
2 Tbsp. minced fresh basil
1/2 tsp. kosher salt
Fresh-ground black pepper

Place the lemon juice, honey, mustard and garlic in a small bowl. Whisk to combine. Continue whisking and drizzle in the oil to incorporate. Then stir in the basil, salt and pepper. Store refrigerated for up to 10 days.

Recipe created for Alaska Seafood Marketing by Kathy Casey Food Studios®

Posted by Kathy on May 26th, 2016  |  Comments Off on Local Salmon The Big Kings Are Coming In! |  Posted in Dishing with Kathy Casey Blog, Kathy Casey, KOMO Radio, Recent Posts, Recipes, salmon, seafood

Pucker Up Rhubarb is Here!

Spring is definitely here when you see the vibrant stalks of rhubarb piled up at grocers and farmers markets.

Rhubarb stalks range in various colors from pale green, sometimes speckled with pink, to fully pink and bright red. The color depends on the variety and is not a guide to quality or degree of sourness. Be careful and make sure to discard rhubarb leaves right away as they are poisonous.

Rhubarb
Rhubarb ready to be made into a d’lish dish!
(Photo courtesy of
SteadyHealth.com)

Rhubarb is of course wonderful in classic pies. But for a little something different, try my recipe for Roasted Rhubarb and Honey Mousse for a unique, spring dessert. Sliced rhubarb is tossed with sugar and then slow-roasted to a tender syrupy goodness then chilled and folded with honey-sweetened whipped cream.

And though we love rhubarb in all things sweet – it’s not just for desserts. Try it in a new savory preparation such as in my Ginger Rhubarb Vinaigrette, it’s so tastydrizzled over spring’s other food star – fresh halibut. Yum!

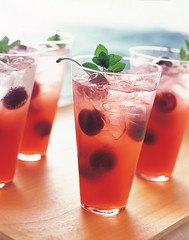
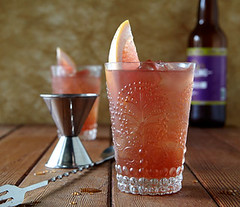
Don’t forget about the drinks! Quench your thirst and whip up a batch of my Rhubarb Myer Lemon Ade. This pretty, pink-hued beverage is a great party sipper or add a shot of vodka or gin for a refreshing spring cocktail.

So celebrate spring in a tart and tasty way with delicious rhubarb! -Kathy

Roasted Rhubarb Honey Mousse
Makes 6 servings

1 pound rhubarb, trimmed and cut in 1-inch pieces (4 cups)
1 cup sugar
———————
3 ounces cream cheese
5 tablespoons honey
1 1/2 cups whipping cream

Preheat oven to 375 degrees.

Toss together rhubarb and sugar and place in a 9- x 13-inch glass baking pan. Roast, uncovered, in preheated oven for 45 minutes, until rhubarb is soft and syrup is slightly caramelized. Stir thoroughly and carefully after the first 20 minutes.

Refrigerate overnight, or for at least 4 hours, until completely cooled.

Whip cream cheese with 4 tablespoons (1/4 cup) of the honey in a mixer until very fluffy. Transfer to a large bowl and fold in chilled rhubarb mixture. Whip the cream with remaining tablespoon honey until firmly peaked. Stir about 1/3 of the whipping cream into the rhubarb-cream cheese mixture to lighten it, then fold in the remaining whipping cream.

Dish up into 6, pretty glasses. Refrigerate until ready to serve, then top with a little plain whipped cream if desired and an edible, spring flower, such as a pansy, or petals of apple, pear or plum tree blossoms.

Note: If selecting edible flowers from your yard, be sure they are edible and have not been sprayed with pesticide or other chemicals. Rinse all blossoms thoroughly.

Recipe by Kathy Casey Food Studios®

Ginger Rhubarb Vinaigrette
This tart and tangy vinaigrette is great drizzled over fresh halibut, grilled scallops or other white fish.

Makes 4 servings

1/2 cup chopped fresh rhubarb
1/4 cup sugar
1/4 cup white wine vinegar
2 teaspoons minced fresh ginger
1 clove garlic, minced
1 teaspoon Dijon mustard
1/2 teaspoon kosher salt
1/4 – 1/2 teaspoon sambal oelek
2 tablespoons coarsely chopped fresh cilantro
1/3 cup canola oil

In a medium saucepan, combine rhubarb, sugar, vinegar, ginger and garlic, and cook over medium heat until rhubarb is tender, about 4 to 5 minutes. Cool to room temperature.

In a medium bowl, whisk together mustard, salt, sambal, and chopped cilantro. Whisk in the cooled rhubarb mixture. Then gradually whisk in the canola oil, emulsifying the vinaigrette. Set aside at room temperature while you are preparing the fish.

Recipe by Kathy Casey Food Studios®

Rhubarb Meyer Lemon Ade
“Bee” sure to use regional honey whenever you can to add some delicious local flavor! For a sophisticated non-alcoholic cocktail, shake about 4 ounces in a cocktail shaker with ice and serve strained in a large martini glass and garnish with a long lemon twist.

Makes about 6 cups or 8 servings

2 large Meyer lemons (or substitute regular lemons)
1 cup local honey
4 cups water
4 cups diced fresh rhubarb
———————
water as needed
lemon wedge for garnishing

With a potato peeler remove only the yellow skin of the lemon, then with a sharp knife slice the zest into fine strips.

Cut lemons in half and squeeze the juice into a 4-cup or 8-cup measure. Do not strain juice — you want to keep all the pulp — just pick out any seeds. Add the lemon peel strips, cover and refrigerate.

Meanwhile, place honey, 4 cups of water, rhubarb and minced rosemary in a saucepan over medium-high heat. Bring to a slow simmer and cook, uncovered, for about 4 – 5 minutes until rhubarb is tender. Remove from heat and let sit at room temperature until cool. Strain through a fine mesh strainer, letting the juice drip through. To keep the juice clear, do not press. (You can let this strain overnight, refrigerated, if you wish.)

Then add the juice to the measuring cup containing the lemon juice and peel. Stir, and add water to make 6 cups total. Pour into a decorative pitcher.

Serve about 6 ounces (3/4 cup) over ice in tall glasses with a lemon wedge.

Recipe by Kathy Casey Liquid Kitchen™

Posted by Kathy Casey on April 28th, 2016  |  Comments Off on Pucker Up Rhubarb is Here! |  Posted in Cocktails, dessert, Dishing with Kathy Casey Blog, Foodie News, KOMO Radio, Recent Posts, Recipes

D’Lish Cookies

Store-bought cookies just never taste as good as homemade. Isn’t this always true? Could it be that the extra dose of hands-on love makes homemade cookies that much more special?
I love cookies and have been making cookies most since I could stand. I still cherish my first Betty Crocker’s Cookie Book. Its colorful pages are to this day encrusted with pieces of dough, sugar, and other cookie ingredient goodies.

S'more Cookie
A Pile of my S’more Cookies available at my Dish D’Lish cafes!

Do you love cookies but never have enough time to whip up a batch? Then try out this baker’s trick. When you do have time, make up a few batches of your favorite cookie doughs then roll them each into logs. Wrap tightly in plastic wrap then label and freeze them. Now, whenever the cookie craving hits you or guests stop by, just pull out a roll, slice, and then bake. Voila! Instant cookies will be ready for that after school snack, cookie craving, special guest, or any fun occasion.

I love experimenting with cookie doughs and see how the flavors bake together. How about taking your favorite chocolate chip cookie recipe and adding hazelnuts, instead of walnuts? Next time, try adding lavender and lemon zest or even herbs in a shortbread cookie. What about a pinch of cayenne pepper to gingersnaps for a sassy twist? Add a splash color to white chocolate macadamia cookies by stirring in dried cherries to the dough.

At my Dish D’Lish® cafes the S’mores Cookies are the most popular cookie. Chocolate dough is studded with toffee bits and finished with a topping of marshmallows and graham crackers  – baked till gooey good!

Everyone has a favorite. Mine is my Mom’s Oatmeal Gumdrop Jewels. My mom has made these cookies ever since I can remember. One of my favorite memories is having the important job of cutting up the gumdrops…and taking a sneaky quick bite every so often!

So get that glass of milk or cup of coffee ready, it’s time to bake up these sweet delights! -Kathy

Dish D’Lish S’mores Cookies
These are the most popular cookie at my Dish D’Lish Cafes! The marshmallow graham cracker topping makes them gooey delicious!

Makes 10 jumbo cookies

Dough
8 tablespoons (1 stick) butter, softened
1/4 cup vegetable shortening
1/2 cup granulated sugar
1/2 cup packed brown sugar
1 egg
1 teaspoon vanilla extract
1 1/2 cups flour
1/2 cup unsweetened cocoa powder
3/4 teaspoon baking soda
1/2 teaspoon salt
One 8-ounce package toffee baking bits

Topping
1 cup mini marshmallows
1/4 cup sweetened condensed milk
1/4 cup graham cracker crumbs

To make the cookie dough, in a mixing bowl, cream the butter, shortening, sugars, egg, and vanilla well. Sift the flour, cocoa, soda, and salt together in a small bowl. Mix into the butter mixture. Stir in the toffee bits.

In a large piece of plastic wrap, roll the dough into a 3-inch-diameter log with flat ends. Wrap well and refrigerate the dough to chill for at least 1 hour, or up to 3 days.

When ready to bake, preheat an oven to 350°F. Line 4 or 5 baking sheets with baking parchment (see Chef’s Note, below).

While the oven is heating, make the topping. Combine the ingredients in a medium bowl and mix with a rubber spatula or spoon until the marshmallows are thoroughly coated. The mixture will be very sticky.

Cut the chilled dough into 10 equal slices. Place 2 or 3 slices on each prepared baking sheet. (When baked, these cookies spread to about a 5-inch diameter, so bake only 2 or 3 per pan.) In the center of each cookie, place about 1 heaping tablespoon of topping, using it all.

Bake the cookies for 18 to 20 minutes, or until just done. Let cool on the baking parchment until totally cooled and easy to remove.

Chef’s Note: If you’re short of baking sheets, just lay out the dough slices on additional pieces of baking parchment. When a pan of cookies is done, remove the pan from the oven, slide the parchment with the baked cookies onto a rack, place the next parchment sheet of dough on the pan and bake.

Recipe © Dish D’Lish®

My Mom’s Oatmeal Gumdrop Jewels
To make this task a bit easier, try snipping them into pieces with clean, wet scissors.

Makes approximately 6 dozen cookies.

2/3 cup butter
1/3 cup shortening
3/4 cup brown sugar
3/4 cup sugar
2 eggs
1 teaspoon vanilla
2 tablespoons buttermilk
2 teaspoons cinnamon
1 teaspoon salt
1 teaspoon baking soda
1 1/2 cups flour
2 cups oatmeal (rolled oats)
1 pound spiced gumdrops, cut up into approximately 1/4-inch pieces}
1/2 cup chopped walnuts
1/2 cup raisins

Heat oven to 350 degrees F.

Cream butter, shortening, sugars, eggs and vanilla. Mix in buttermilk. Sift together dry ingredients and blend in. Mix in oatmeal, gumdrops, walnuts and raisins. Chill 2 hours, then drop by tablespoonfuls on a greased baking sheet. Bake 10 – 12 minutes or until golden.

Recipe by Kathy Casey Food Studios®

Posted by Kathy Casey on April 21st, 2016  |  Comments Off on D’Lish Cookies |  Posted in Books to Cook, dessert, Dishing with Kathy Casey Blog, Foodie News, KOMO Radio, Recent Posts, Recipes
Untitled