Recipes

Nutritious & D’lish Almonds!

Almonds! Whether you like them raw, toasted, or made into a smooth butter, these little nuts are great for you. They’re rich in dietary fiber, vitamin E, and minerals like calcium, iron, magnesium and zinc.

Most importantly, they’re a great source of protein and perfect for a mid-day snack! Just 10 raw almonds can give you a quick pick-me-up!

I also love them toasted and tossed into basmati rice, sprinkled over yogurt or in my morning oatmeal. And of course, they add a great a great crunch factor to salads like in my Cranberry Almond Crunch Slaw. Try switching almonds in, instead of walnuts, for your next batch of chocolate chip cookies.

Speaking of baking, this summer get creative with your fruit shortcake by whipping up a batch of Cinnamon Almond Shortcakes – top with a bounty of seasonal fruits (e.g.: strawberries, raspberries, cherries, apricots, peaches, grilled pineapple, etc.) and a poof of brown sugar whipped cream – yum! –Kathy

Cranberry Almond Salad

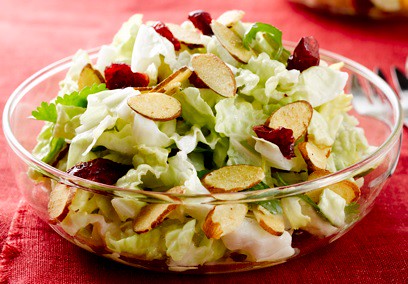
Photo by Kathy Casey Food Studios®

Cranberry Almond Crunch Slaw
Makes about 8 servings

1/3 cup unseasoned rice vinegar
1/4 cup honey
1/4 cup sour cream or plain Greek yogurt
1 tsp salt
1 tsp sambal oelek or other Asian red chili paste, or a pinch of red chili flakes
4 green onions, thinly sliced
10 cups thinly sliced napa cabbage (about 1 large head)
1/2 cup dried cranberries, coarsely chopped
1/2 cup coarsely chopped fresh cilantro
1 package Almond Accents Honey Roasted sliced almonds, or 1 cup toasted sliced almonds

In a large bowl, whisk together vinegar, honey, sour cream, salt and sambal oelek. Add green onions, cabbage, cranberries and cilantro and toss until well coated.

The salad should sit for 30 minutes before serving. If making way ahead, refrigerate dressing and salad ingredients separately, then toss together 30 minutes before ready to serve. Toss Almond Accents into salad right before serving.

Recipe by Kathy Casey Food Studios®

Cinnamon Almond Scones
This not-too-sweet, nutty scone is the perfect foil for sweet summer stone fruit shortcake. Serve 6 scones for dessert and then you’ll have 2 extra for breakfast or seconds!

Makes 8 scones

2 1/4 cups flour
1/4 cup sugar
3/4 tsp baking soda
1/2 tsp salt
1/2 tsp ground cinnamon
8 Tbsps (1 stick) butter
1/4 cup sliced almonds
1 egg
3/4 cup buttermilk, plus more if needed
1 egg white
1/2 tsp water

Preheat an oven to 375°F. Sift the flour, sugar, baking soda, salt, and cinnamon together into a large bowl. Cut in the butter with a pastry blender or 2 dinner knives until the mixture is the texture of coarse crumbs (just like making a pie crust). Stir in the almonds.

In a separate bowl, whisk the whole egg with the 3/4 cup buttermilk until blended. Make a well in the center of the flour mixture and pour the liquid into it. Combine with a few swift strokes. The dough should form a ball and all the flour should be incorporated. (If the dough is way too dry, add 1 tablespoon more buttermilk.) Do not overmix.

On a lightly floured surface, pat the dough into a 3/4-inch-thick round. Carefully place on an ungreased baking sheet, then cut into 8 wedges, leaving the sides still touching.

In a small bowl, whisk the egg white and water until mixed, then brush the dough lightly with the egg white glaze.

Bake for 30 to 35 minutes, or until the scones are cooked through and golden. Let cool slightly before serving.

Recipe adapted from Kathy Casey’s Northwest Table, Chronicle Books.

Posted by Kathy Casey on May 11th, 2013  |  Comments Off on Nutritious & D’lish Almonds! |  Posted in dessert, Dishing with Kathy Casey Blog, Fruit, KOMO Radio, Recent Posts, Recipes, salads, sides

Refreshing Mint

Mmmmm — fresh mint the fragrance is just so uplifting. Over the years, we’ve loved it in libations from classic mint juleps in frosted silver cups to the ever popular mojito. Nothing says refreshing quite like mint, whether it’s shaken, hand-pressed or added in some way or another to a great cocktail.

Mint
Photo by Kathy Casey Liquid Kitchen®

I like to get creative with mint and experiment with new and exciting combinations like in my Sake Refresh. This cocktail is made with cucumber, mint, vodka, sake and lime – super-refreshing and not-so-sweet. It’s perfectly paired with Asian foods and sushi.

Love mojitos? I know that I do! Lots of mint in your garden and don’t know what to do with it – try making an easy to make mint syrup – sugar, water, mint – boil – steep then strain…. and refrigerate for the next time you mix up that mojito!

In honor of the upcoming Kentucky Derby, I’ve twisted it up a bit with my Apricot Julep. It’s a tasty fruit spin on the classic — enlivened with plumped apricots, bourbon and mint of course, a splash of apricot brandy and a dash of bitters.

For more cocktail inspiration and ideas, make sure to check out my cocktail show at www.LiquidKitchen.tv.

So cheers to shaking it up with fresh mint in your next cocktail! –Kathy

Sake Refresh
Makes 1 drink

1 sprig fresh mint
4 slices fresh cucumber
3/4 oz simple syrup*
1 1/2 oz vodka
1/2 oz sake
3/4 oz fresh lime juice
Garnish: thin cucumber slice

Tear mint sprig and drop into a cocktail shaker. Add cucumber slices and simple syrup. Mash ingredients together with a muddler or the back of a spoon. Add vodka, sake, and lime juice. Fill shaker with ice, and shake vigorously. Strain into a chilled cocktail glass. Garnish with a cucumber slice.

*Simple Syrup: combine 2 cups sugar with 2 cups water in a small sauce pan. Bring to a boil then immediately remove from heat. Cool and store refrigerated.

Recipe by Kathy Casey Liquid Kitchen®

Apricot Julep
Makes 1 drink

6 large mint leaves
1 Tbsp Plumped Apricots with syrup (recipe follows)
1 oz bourbon
1/4 oz apricot brandy
dash of Angostura bitters

In a cocktail shaker, combine mint leaves and apricots with their syrup. Hand-press with a muddler. Add bourbon, brandy and bitters. Fill shaker with ice, and shake vigorously. Pour entire drink into a rocks glass.

Plumped Apricots
Makes about 1 1/2 cups, enough for about 20 drinks

1 cup chopped dried apricots
3/4 cup boiling water
1/2 cup super-fine sugar
2 tablespoons fresh lemon juice

Combine all ingredients in a heatproof container. Stir until sugar is completely dissolved. Cover loosely and let sit for at least 8 hours or overnight at room temperature before using. Store refrigerated until needed.

Recipe by Kathy Casey Liquid Kitchen®

Posted by Kathy Casey on April 27th, 2013  |  Comments Off on Refreshing Mint |  Posted in Cocktails, Dishing with Kathy Casey Blog, Fruit, KOMO Radio, Lifestyle, Recent Posts, Recipes

Decadent Chocolate

Do you love chocolate? Have you admitted to being a “chocoholic?” I know there are a ton of you out there, including me! I can’t get enough of Seattle’s fabulous local chocolates!

Fran’s Chocolate is a Seattle institution when it comes to sweets. Internationally recognized, Fran Bigelow is truly the Mother of Chocolate in Seattle. From hand-dipped truffles, to sea salt caramels, everyone has their favorite treat. My personal guilty pleasure is the famous Gold Bar – gooey buttery caramel studded with almonds and covered with dark chocolate – yum! It’s definitely one of my go-to’s.

Theo Chocolate is another top dog in Seattle, famous for their delicious bars. Theo’s is also dedicated to addressing social issues, something we love to support! Theo is the only Organic, Fair Trade, Fair for Life certified Bean-to-Bar chocolate factory in North America. In fairly recent news, they have teamed up with Ben Affleck to help Congolese farmers.

Theo Chocolate
Theo Chocolate in Seattle’s Fremont Neighborhood!

You can visit the Theo’s shop in Fremont and browse all of their delectable chocolates, and even take a tour! Watch as their artisans hand-place garnishes, learn about their chocolate-making process, and even get a little sample! What a yummy excursion!

Hot chocolate more your style for a good chocolate fix? Be sure to check out Chocopolis in Queen Anne! Chocopolis can make any of their artisanal chocolate bars sippable! They also host Chocolate Happy Hours on Thursday evenings and tasting classes.

So when you get the craving to bite into something a little sweet, head to one of Seattle’s wonderful chocolatiers!  Or if you want to get your chocolate fix in your own kitchen try whipping up on of my fave recipes: Chocolate- Cherry Pound Cake a la mode with Drunken Tart Cherries made with dried tart cherries from the Chukar Cherry Company, who’s been producing all natural dried cherries in the Northwest since 1988! – Kathy

Chocolate-Cherry Pound Cake à la mode with Drunken Tart Cherries
Makes 8 servings

Cake
8 tablespoons (1 stick) butter, softened
1 cup sugar
2 eggs
1 teaspoon vanilla extract
1 1/2 cups flour
1/4 cup unsweetened cocoa powder (regular, not Dutch process)
1 1/2 teaspoons baking powder
1/2 teaspoon baking soda
1/4 teaspoon salt
1/2 cup milk
3/4 cup dried tart cherries
1 cup (6 ounces) bittersweet chocolate chips or chunks

Glaze
1/2 cup (3 ounces) bittersweet chocolate chips or chunks
1/4 cup heavy cream

Chocolate cherry ice cream or other ice cream of your choice
Drunken Tart Cherries (recipe follows)

Preheat an oven to 350°F. Butter and flour a 5-by-9 1/4-inch nonstick loaf pan and set aside.

To make the cake, cream the butter and sugar in a large mixing bowl with an electric mixer until very fluffy. Beat in the eggs, one at a time, until thoroughly incorporated, scraping down the sides of the bowl often. Beat in the vanilla.

In a small bowl, mix the flour, cocoa, baking powder, baking soda, and salt.

With the mixer on low speed, add the flour mixture, in three parts, to the butter mixture alternately with the milk, beginning and ending with the flour mixture. Mix only until well combined; do not overmix.

Remove the bowl from the mixer and fold in the cherries and chocolate chips. Scrape the batter into the prepared pan, filling evenly. Rap the pan sharply on a counter several times to release any air bubbles, then smooth the surface of the batter.

Bake for about 50 to 60 minutes, or until a toothpick inserted in the center comes out clean. Rotate the pan after the first 30 minutes of baking.

Unmold the cake and turn it right side up. Let cool thoroughly on a wire rack before glazing.

To make the glaze, in a small saucepan or in a microwave oven, gently heat the chocolate and cream until the chocolate is just melting. Remove from the heat and stir until the chocolate is thoroughly melted and mixture is smooth. Let cool to almost room temperature but still liquid. Pour over the cooled cake. Let the glaze set for 15 minutes before serving.
To serve, slice the cake into 16 slices and serve 2 slices, shingled, per serving. Top with a scoop of ice cream and a spoonful of cherries with their syrup.

Drunken Tart Cherries
Makes 1 cup

1 cup pitted dried tart cherries
1/4 cup amaretto liqueur
3 tablespoons sugar
1/4 cup boiling water

Mix the cherries, amaretto, and sugar in a small bowl. Pour the boiling water over the cherries and stir well. Cover and let sit at room temperature for at least 12 hours before using. Store, refrigerated, for up to 2 months.

Recipe from Kathy Casey’s Northwest Table, Chronicle Books.

Posted by Kathy Casey on April 18th, 2013  |  Comments Off on Decadent Chocolate |  Posted in Amazon, dessert, Dishing with Kathy Casey Blog, Foodie News, Fruit, KOMO Radio, Lifestyle, Recent Posts, Recipes

Quinoa: the Gold of the Incas!

There’s been a lot of buzz about “wonder foods” and quinoa (pronounced KEEN-wah) is certainly one of them! Nicknamed “gold of the Incas”, quinoa is an ancient grain getting a lot of recognition. It is showing up on menus all over! From quinoa eggs Benedict to hearty supper side dishes, this little seed is gaining high acclaim in the food world.

There are so many benefits to quinoa. It is high in fiber, a complete protein, and contains no gluten, making it perfect for vegans and those with gluten sensitivities.


Red Quinoa!
(Photo courtesy of FitSugar)

Quinoa is easy to cook and highly adaptable. This little seed gets light and fluffy after cooking and has a subtle nutty taste that pairs well with other flavors. My favorite cooking technique is to lightly toast the seeds in a dry pan before cooking them to bring out that delicious nutty flavor.

This wonder food is great as a side dish and fantastic in salads like in my Big Protein Red Quinoa Salad, which is studded with cucumber, garbanzo beans, hazelnuts and golden raisins – yum! Perfect as a side dish or easy to make and pack for a healthy fulfilling lunch.

Give this mighty seed a try: it’s great for you and its d’lish… what a fantastic combo! –Kathy

Big Protein Red Quinoa Salad
I like to make this salad with all organic produce and also add in a cup of chopped fresh raw kale for extra fiber!

Makes about 4 cups

3/4 cup red quinoa
1 1/2 cups water
1 teaspoon minced garlic
2 tablespoons extra-virgin olive oil
1/4 cup fresh lemon juice
2 teaspoons minced or grated lemon zest
1/2 cup peeled, seeded and 1/4-inch-diced organic cucumber
1/2 cup canned organic garbanzo beans, drained
1 tablespoon chopped fresh dill
1/2 cup chopped fresh parsley
1/2cup organic golden raisins
1/2 cup organic hazelnuts, lightly toasted and coarsely chopped
1/4 cup thinly sliced green onions
1/4 cup grated carrot
3/4 to 1 teaspoon sea salt
1/4 teaspoon black pepper

Rinse quinoa in cold water and drain well. Put the drained quinoa in a heavy medium saucepan and dry roast the grain over medium heat, stirring occasionally for about 1 minute. Add the water, bring to a boil, then reduce to a simmer and cover with a tight-fitting lid. Cook for about 15 minutes or until all water is absorbed. Remove from the heat and let stand, covered, for 10 minutes. Remove lid, fluff grains with a fork, and let cool to room temperature.

In a large bowl, combine the cooked quinoa with the remaining ingredients and toss well.

*Available at PCC Markets and Whole Foods.

Recipe by Kathy Casey Food Studios®

Posted by Kathy Casey on April 11th, 2013  |  Comments Off on Quinoa: the Gold of the Incas! |  Posted in Dishing with Kathy Casey Blog, KOMO Radio, Lifestyle, Recent Posts, Recipes, salads, sides

Driscoll’s Berries

I’m just back from a day with Driscoll’s Berries and had a berry-licious day eating and learning all about berries. Raspberries. Blackberries. Strawberries. Blueberries. OH MY! With all this tasty inspiration, I wanted to share my favorite Billowing Strawberry Poppy Seed Layer Cake and Strawberry Shag recipes. Stay tuned for more blogging about my trip and other berry-inspired ideas – make sure to follow me on Twitter @KathyCaseyChef for more berry pictures!

Strawberries2Strawberries1
Berries for the pickin’ and munchin’!

For other fun berry-ful recipes, make sure to check out the Driscoll’s berry blog, too! -Kathy

Billowing Strawberry Poppy Seed Layer Cake
Bakeries often freeze their cake layers before filling and frosting them, as doing so is easier when the cake is really firm. Generally, by the time you have finished frosting the cake, it has defrosted and is ready to eat.

Makes 1 (3-layer) cake, serving 12 to 14

Strawberry Cake
Recipe by Kathy Casey Food Studios®

Cake
2 1/4 cups flour
1 1/2 cups sugar
1 tablespoon baking powder
1/2 teaspoon salt
8 tablespoons (1/2 stick) butter, softened
1 cup whole milk
2 eggs
1 1/2 teaspoons vanilla extract
2 tablespoons poppy seeds

Frosting
8 ounces cream cheese, softened
2 teaspoons vanilla extract
3 cups powdered sugar
2 cups cream

Filling
1/2 cup high-quality strawberry jam
1 pint fresh Driscoll’s strawberries, stemmed and thinly sliced

1 pint fresh Driscoll’s strawberries for garnish

Preheat an oven to 350°F. Grease and flour three 8-inch round cake pans and set aside.

In the bowl of a standing mixer or other large mixing bowl, sift together the flour, sugar, baking powder, and salt. Add the softened butter. Using an electric mixer, mix on medium speed for 1 minute. Add half of the milk and mix for 2 minutes more to cream the batter. Scrape down the sides of the bowl with a rubber spatula and add the remaining milk, eggs, and vanilla. Continue mixing on medium speed for 2 more minutes. Stir in the poppy seeds.

Divide the batter evenly among the prepared pans and bake for 20 to 25 minutes, or until a cake tester or toothpick inserted in the center comes out clean.

Remove from the oven and cool in the pans on a rack for 10 minutes. Run a knife around the edge of each cake layer and turn it out onto a rack to cool thoroughly.

Meanwhile, make the frosting: Using an electric mixer, beat the softened cream cheese and vanilla on medium speed for 1 minute. Turn the speed to high and mix for 1 minute. Stop the mixer, add 1 cup of the powdered sugar, and mix on low speed for 1 minute. Repeat twice, until all the powdered sugar has been added, then increase the mixer speed to high and whip for 3 minutes.

In another bowl, whip the cream until stiff, then fold it gently into the cream cheese mixture until just incorporated. Refrigerate until ready to frost the cake.

To make the filling: In a medium bowl, stir the strawberry jam until smooth, then gently fold in the strawberries. Set aside until ready to fill the cake.

To assemble and frost the cake: On a large cake plate, place 1 layer of the cake. Spoon one-half of the strawberry filling in the center, then spread it out to 3/4 inch from the edge. Top with 1 cup of the frosting and spread the frosting to 3/4 inch from the edge. Place another layer of cake on top and repeat. Place the final layer of cake on top, then press down gently on the cake layers to stabilize them.

With a large rubber or cake spatula, mound half of the remaining frosting on the top of the cake. Spread the other half around the sides of the cake, covering up all cake and swirling the frosting decoratively. Smooth out the frosting on the top of the cake. Let the frosting dry a little before garnishing the cake.

Stem the garnish berries, and cut in half lengthwise. Place, cut sides down, around the top edge of the cake. Arrange any extra strawberries in a small pattern in the middle of cake. Refrigerate the cake until ready to serve.

Recipe by Kathy Casey Food Studios®

Strawberry Shag
Fresh basil lends a fun flavor note to the classic combination of strawberries and lemonade. Soda water introduces a lively sparkle. For other libatious inspiration, make sure to check out Kathy Casey’s Liquid Kitchen!

Makes 1 drink

1 to 2 large sprigs fresh basil
1/4 cup Sugared Strawberries with juice
1 1/2 ounces vodka
1 ounce fresh lemon juice
3 to 4 ounces chilled soda water

For garnishing
Fresh Driscoll’s strawberry
Small basil leaf

In a cocktail shaker, press the basil and strawberries together with a muddler to release the basil’s flavor. Fill the shaker with ice. Measure in the vodka and lemon juice. Cap and shake vigorously. Pour into a large glass, top with soda water, and stir. Garnish with a strawberry and basil leaf.

Sugared Strawberries
Makes enough for about 6 drinks

1 pint fresh Driscoll’s strawberries, stemmed and thinly sliced
1 1/2 cups powdered sugar

Mix the ingredients and let sit for 15 minutes before using.

Recipe from Kathy Casey Sips & Apps, Chronicle Books

Posted by Kathy Casey on April 6th, 2013  |  Comments Off on Driscoll’s Berries |  Posted in Amazon, Books to Cook, Cocktails, Dishing with Kathy Casey Blog, Foodie News, Fruit, Lifestyle, Recent Posts, Recipes, Tasty Travels

Dip In To Yum!

Everyone has their go-to dips! Gooey, cheese fondue to classic sour cream and French onion to 7-layer Mexican—all perfect for almost any occasion from game day to patio parties.

But these days there are lots of creative, healthier spins to dips as well. We’re seeing less full-fat sour cream and more Greek yogurt and lighter mayos. Even this party staple can’t escape the better-for-you revolution!

Hummus is all the rage lately. Made with protein rich garbanzo beans, this is super, quick and easy to make from scratch, but is also available in a wide variety of flavors at your local grocery store. From roasted red pepper to sun-dried tomato, hummus is packing some serious flavor.

Creamy white bean dips are also popular and fall into the better-for-you category as well. We are even seeing “edamame hummus” popping at stores like Whole Foods!

It’s fun and tasty to layer dips too – like in my sophisticated Tuscan White Bean Dip Layered with Green Olive and Lemon Tapenade. Start with a creamy, rich white bean base and top with some bold flavored green olive and lemon tapenade – this flavor combo is sure to delight your next houseguests!

We all love to dip with potato and tortilla chips, but you can lighten up your dippables, too! Try something new like baked pita chips, rice crackers for gluten-free options, as well as fresh endive leaves, slices of crunchy fennel, colorful bell pepper pieces and French radishes. What a great way to add some color to your plate as well!

Get out of your dip rut, lighten up and try something new! –Kathy

Tuscan White Bean Dip Layered with Green Olive and Lemon Tapenade
I love to make the tapenade with those brilliant green Castelvetrano olives available at olive bars. If you want to take some extra time and pit them rather than buying pitted jarred olives, it is worth it! I like to serve this dip with pita chips or rustic crackers.

Makes 3 cups, or about 8 to 10 servings

Dip
1 (15-ounce) cans white beans, drained well
2 tablespoons grated Parmesan cheese (optional)
3 cloves fresh garlic, peeled
pinch of red pepper flakes
1 tablespoon fresh lemon juice
1 teaspoon very finely minced lemon zest
1 teaspoon very finely minced fresh rosemary
1/2 teaspoon kosher salt
1/4 cup extra-virgin olive oil

Tapenade
1 1/2 cups pitted manzanilla or other green olives, drained
1 tablespoon minced fresh garlic
1 tablespoon lemon juice
1 tablespoon very finely minced lemon zest
2 tablespoons extra-virgin olive oil or oil from sun-dried tomatoes
1/4 cup coarsely chopped Italian parsley
1/4 cup finely chopped sun-dried tomatoes in oil, drained

Garnish: extra-virgin olive oil and fresh rosemary sprig

To make the dip: In a food processor, combine the drained beans, cheese, if using, and garlic, and process for about 1 minute. Scrape down the sides of the bowl and add the pepper flakes, lemon juice and zest, rosemary and salt. With the motor running, add the oil through the feed tube in a slow stream. Process until smooth. Taste for salt and adjust if desired. Store the dip, covered and refrigerated, for up to 3 days.

To make the tapenade: In a food processor, combine the olives, garlic, lemon juice and zest, and oil, and pulse till the ingredients are thoroughly chopped, but still have some coarseness to them. Add the parsley and sundried tomatoes and pulse until just integrated. The tapenade can be stored, covered and refrigerated, for up to 1 week.

To serve: Put the dip in a pretty bowl, smooth out the surface, then layer the tapenade on top. Drizzle with a tiny bit of olive oil, and garnish with the rosemary.

Recipe by Kathy Casey Food Studios®

Posted by Kathy Casey on March 29th, 2013  |  Comments Off on Dip In To Yum! |  Posted in appetizers, Cocktails, Dishing with Kathy Casey Blog, KOMO Radio, Lifestyle, other, Recent Posts, Recipes, sides

D’Lish Deviled Eggs on Epicurious!

Quick read in Epicurious! Check out my deviled egg recipes for Luxe Truffle, Red-Hot Buffalo, and Devilish Green Eggs & Ham. Perfect for springtime and Easter celebrations!

For more tips and ideas, head to www.dlishdeviledeggs.com!

Posted by Kathy Casey on March 29th, 2013  |  Comments Off on D’Lish Deviled Eggs on Epicurious! |  Posted in appetizers, Books to Cook, Dishing with Kathy Casey Blog, Foodie News, Recipes, sides

D’lish Deviled Eggs on New Day Northwest!

I had a blast with King 5’s Margaret Larson on New Day Northwest earlier this morning talking all about my latest book, D’Lish Deviled Eggs! With over 50 classic and creative recipes, there’s definitely an egg for everyone and every occasion.

Beet'ing Heart
Beet’ing Heart Deviled Eggs! Love the color!

(Photo by Kathy Casey Food Studios from D’Lish Deviled Eggs, Andrews McMeel Publishing)

Want to know my tips and secrets for how to make the perfect deviled egg? Start by making sure to hard-cook (not boil!) your eggs with my tip below. Then dress your deviled with my tasty variations: Goat Cheese and Peppadew, “California Roll,” and Beet’ing Heart deviled eggs.

California Roll egg

Creative way of incorporating sushi into an egg app: “California Roll” Deviled Eggs topped with
Alaska King Crab, cucumber, furikake and tobiko.
(Photo by Kathy Casey Food Studios from D’Lish Deviled Eggs, Andrews McMeel Publishing)

For another fun deviled egg recipe, try my Emerald Asparagus & Sweet Onion Deviled Eggs found in the Seattle Time’s Pacific NW Magazine! Here’s to a wonderful spring season and Easter holiday! -Kathy

Goat Cheese and Peppadew Eggs
Creamy goat cheese and tangy sweet Peppadew peppers tango with a hit of Tabasco heat in this sexy deviled egg combo. Topped with a Spanish Marcona almond for a touch of salty crunch, these zippy bites are sure to please everyone’s palate.

Makes 24

1 dozen hard-cooked eggs (recipe follows)

Filling
3 to 4 ounces chèvre-style goat cheese (about 1/2 cup)
1/4 cup mayonnaise
1 1/2 teaspoons Tabasco sauce
8 Peppadew peppers, drained well and finely chopped (about 1/4 cup)

Topping
24 Marcona almonds
2 tablespoons minced fresh parsley

Halve the eggs lengthwise and transfer the yolks to a mixing bowl. Set the egg white halves on a platter, cover, and refrigerate.

With a fork, mash the yolks to a smooth consistency. Add the goat cheese, mayonnaise, Tabasco, and mix until smooth. (You can also do this in a mixing bowl with a whip attachment.) Stir in the peppers.

Spoon the mixture into a pastry bag fitted with a plain or large star tip, then pipe the mixture evenly into the egg white halves. Or fill eggs with a spoon, dividing filling evenly.

Top each egg half with a Marcona almond and a sprinkle of parsley.

Hard-Cooked Eggs

1 dozen large chicken eggs

Place the eggs in a large nonreactive saucepan and add cold water to 1 inch above the eggs. Bring to a boil over medium-high heat. Turn off the heat and let the eggs sit for 10 minutes. Remove from the stove and run cool water over the eggs in the pan until they are cooled. When cool, carefully peel them under running water.

Recipe from D’Lish Deviled Eggs by Kathy Casey, Andrews McMeel Publishing

“California Roll” Deviled Eggs
Part of the allure of sushi is the beautiful presentation, and these California-roll-inspired eggs are dressed to impress. The wasabi and avocado filling whips up in no time, so you can spend a little longer making them look like the work of art they are!

Makes 24

1 dozen hard-cooked eggs

Filling
1/2 ripe avocado
3 tablespoons mayonnaise
1 tablespoon purchased wasabi paste (or 1 tablespoon wasabi powder mixed with 1 tablespoon water)
1/4 teaspoon salt

Topping
2 ounces Alaska King Crab meat (about 1/3 to 1/2 cup)
24 small cucumber fans (see tip)
Nori komi furikake (sesame seed–seaweed sprinkle)
2 tablespoons tobiko (flying fish roe)

Halve the eggs lengthwise and transfer the yolks to a small bowl. Set the egg white halves on a platter, cover, and refrigerate.

In a mixing bowl, mash the avocado well with a fork, then add the yolks and mash to a smooth consistency. Add the mayonnaise, wasabi paste, and salt, and mix until smooth.

Spoon the mixture into a pastry bag fitted with a plain or large star tip, then pipe the mixture evenly into the egg white halves. Or fill the eggs with a spoon, dividing the filling evenly.

Top each egg half with a little crabmeat, a cucumber fan, a sprinkle of furikake, and about 1/4 teaspoon tobiko.

Tip: To make tiny cucumber fans, quarter a 4-inch piece of English cucumber lengthwise. Then cut each quarter into 18 thin slices—the goal is to get 3 tiny slices per “fan.” See photo for reference.

Recipe from D’Lish Deviled Eggs by Kathy Casey, Andrews McMeel Publishing

Beet’ing Heart Deviled Eggs
I’m all for an appetizer that doubles as a fun craft project, and these eggs certainly fit the bill. Pickled beet juice turns the whites a deep pink color and makes these perfect for serving up on Valentine’s Day or Easter. Kids will love helping turn their eggs pink.

Makes 24

1 (15-ounce) can sliced pickled beets
1/2 cup red wine vinegar
1/4 cup sugar
1 dozen hard-cooked eggs

Filling
3 tablespoons mayonnaise
3 tablespoons sour cream
2 tablespoons stone-ground mustard
2 tablespoons minced red onion
1/4 teaspoon sugar
1/4 teaspoon salt
Fresh-cracked black pepper

Topping
1/4 cup reserved tiny-diced pickled beets, drained well
2 tablespoons thinly sliced green onion

To pickle the eggs, drain the beet liquid into a deep medium container and reserve the beets separately. Add the red wine vinegar and sugar to the beet liquid and stir to dissolve the sugar. Peel the hard-cooked eggs and add to the mixture, being sure they are submerged. Cover and let sit for at least 2 hours or overnight, refrigerated. Stir often to color evenly.

Drain the eggs well, pat dry on paper towels, and discard the beet liquid. Halve the eggs lengthwise and transfer the yolks to a mixing bowl. Set the egg white halves on a platter, cover, and refrigerate.

To finish the eggs, with a fork, mash the yolks to a smooth consistency. Add the mayonnaise, sour cream, mustard, red onion, sugar, and salt, and mix until smooth. (You can also do this in a mixing bowl with a whip attachment.) Add black pepper to taste.

Spoon the mixture into a pastry bag fitted with a plain or large star tip, then pipe the mixture evenly into the egg white halves. Or fill the eggs with a spoon, dividing the filling evenly.

Top each egg half with 1/2 teaspoon of pickled beets and a sprinkle of green onion.

Tip: For a “polka dot” effect, firmly pack the eggs into a narrow container so that they are all touching, and do not stir them. The eggs will be lighter pink or white where they touch, lending a fun polka dot pattern.

Recipe from D’Lish Deviled Eggs by Kathy Casey, Andrews McMeel Publishing

Posted by Kathy Casey on March 27th, 2013  |  Comments Off on D’lish Deviled Eggs on New Day Northwest! |  Posted in appetizers, Books to Cook, breakfast, Dishing with Kathy Casey Blog, Foodie News, Lifestyle, Recent Posts, Recipes, seafood, videos
Untitled