Sweet Potatoes

Don’t you just love sweet potatoes? I know I love’em! They are one of those magical foods that are delicious, versatile, inexpensive, AND pretty darn good for you. They come in a variety of colors like blue, purple, orange, yellow and white, and the flesh is full of beta-carotene (great for your eyes) and vitamins A and C.

Fun fact: Did you know that potatoes, sweet potatoes and yams are all unrelated? Potatoes are related to tomatoes and peppers (members of the nightshade family), sweet potatoes are in the morning glory family and yams are related to lilies – who knew!

One of my favorite ways to cook sweet potatoes is to cut them in thick slices and toss with chunks of apple, a little olive oil, and salt then roast on a shallow pan in a 375 degree oven till roasty good.

Or just roast them like you would a regular baker then split and top with brown sugar, a little butter. They are also delicious naked with just a little sprinkle of salt and pepper!

Last holiday season I had a brainstorm to try a scalloped-like sweet potato dish. I thought I’d put a little maple syrup in it and a touch of sage and top it with a few bread crumbs. Well, my experiment was a hit! So I’ve retested my concoction and included my recipe for Maple Scalloped Sweet Potatoes with Sage. I love it served with ham or roasted tenderloin. It serves 10 – 12 so is great for a large party. –Kathy

Maple Scalloped Sweet Potatoes with Sage
Serves about 10-12

8 cups peeled and thinly sliced (1/4 inch) sweet potatoes (about 2 1/2 – 3 pounds)

Maple Cream
3 cups cream
1/2 cup real maple syrup
1/4 teaspoon ground nutmeg
2 teaspoons minced fresh thyme
1 1/2 teaspoons finely chopped fresh sage leaves
1 1/2 teaspoons salt
1/4 teaspoon ground black pepper

Topping
1/2 cup dry breadcrumbs
3 tablespoons high-quality grated parmesan cheese
2 teaspoons minced fresh thyme
1 tablespoon minced fresh parsley
2 teaspoons finely chopped fresh sage leaves

fresh sage leaves for garnish

Preheat oven to 350 degrees.

Spray a 3-quart casserole with pan spray or lightly butter it. Then arrange sliced sweet potatoes in an even layer. In a large bowl whisk together the maple cream ingredients until well combined. Pour the maple cream over sweet potatoes and push them down a bit to be sure they are coated in liquid.

In a small bowl combine topping ingredients and set aside.

Bake casserole for 35 minutes and then sprinkle with topping and bake another 25 – 35 minutes or until topping is browned, potatoes are tender and liquid is thickened.

Garnish with a sprinkle of fresh sage leaves.

Recipe by Kathy Casey Food Studios®.

Posted by Kathy Casey on March 26th, 2020  |  Comments Off on Sweet Potatoes |  Posted in Dishing with Kathy Casey Blog, KOMO Radio, Recipes, sides

Kohlrabi: The New “It” Vegetable?

Kale is the green vegetable of the hour, but have you heard of its new rival kohlrabi? Popular in Europe and Asia, kohlrabi is finally turning heads here in the states and popping up on menus everywhere!

(Photo from Renee’s Garden)

Also known as German turnip or turnip cabbage, this root vegetable is a great source of fiber and is power packed with loads of vitamins and minerals, including Vitamins C, B6, and E as well as potassium and phosphorus.

It can be eaten raw, roasted, or steamed or any way you like it. Raw kohlrabi is crunchy with bit of sweetness and slightly spicy. Think of a cross between a radish and a turnip.

It’s great when tossed into a salad or shredded for a tasty slaw. Kohlrabi also tastes d’lish when simply drizzled with a good olive oil and a sprinkling of sea salt. Roast it as you would a root vegetable or use in a tasty soup. Or make a quick spicy kohlrabi pickle. Even use its leaves in a quick saute.

The Kitchn Blog has a great piece on kohlrabi with tasty links and different ways to prepare it. –Kathy

Posted by Kathy Casey on March 12th, 2020  |  Comments Off on Kohlrabi: The New “It” Vegetable? |  Posted in Dishing with Kathy Casey Blog, Foodie News, KOMO Radio, Recent Posts

Toast the Season with Cranberries

Whether you like them as a side sauce cozied to turkey or made into a holiday garland with popcorn, nothing is as perfect for the holidays than cranberries!

Seasonal foods just naturally go together. The apple, for example, is the perfect foil for its seasonal cousin the cranberry. They’re great together in my Apple Cranberry Tart with Walnut Crust and Cranberry Semifreddo. How about a salad of winter greens with slices of crisp galas and spicy toasted walnuts tossed with my favorite holiday dressing, Cranberry Citrus Vinaigrette.

But hey you can get crafty with them, too! For an impressive DIY holiday gift, try whipping up a batch of Crimson Cranberry Sage Vinegar to give out this year. Thread cranberries on a skewer and slip into a decorative clear bottle. Poke in a few sprigs of fresh sage, then add a pinch of sugar and salt to champagne vinegar – whisk together then pour into the bottles, covering the cranberries and sage. Cap and let sit at least one week before using. This vinegar makes a splendid and  colorful gift.

So grab a few extra bags of fresh cranberries while they are in season and freeze a few bags for enjoying later. -Kathy

Cranberries 2
(Photo from Kathy Casey’s Northwest Table)

Washington Apple-Cranberry Tart with Walnut Crust & Cranberry Semifreddo
Makes 10 servings

Filling
1 tablespoon butter
4 pounds Gala apples, peeled, cored, and cut into 1/4-inch-thick wedges (6 cups)
1/2 cup fresh or frozen cranberries
2 tablespoons brandy
2 teaspoons fresh lemon juice
1/2 cup sugar
2 teaspoons ground cinnamon

Crust
8 ounces (2 sticks) unsalted butter at room temperature
3/4 cup granulated sugar
1/4 cup packed brown sugar
2 teaspoons vanilla extract
1 egg, separated
3 egg yolks
2 1/2 cups flour
1/4 teaspoon salt
1/2 cup very finely chopped walnuts
2 tablespoons sanding or coarse sugar

Cranberry Semifreddo (recipe follows)
10 fresh or frozen cranberries for garnishing

To make the filling, heat the butter in a large saucepan over medium-high heat and add the apples and cranberries. Stir in the brandy and lemon juice, then add the sugar and cinnamon. Cook until the apples are just wilted but still firm, and the juices have evaporated and cooked out; the mixture should be almost dry, not wet. Transfer to a shallow pan and cool in the refrigerator while making the crust.

Preheat an oven to 350°F. Line the bottom of a 9- or 10-inch springform pan with a parchment round. Lightly butter the sides of the pan and the parchment, or spray with vegetable-oil cooking spray. Set aside.

To make the crust, in a mixing bowl, beat the butter with the sugars on medium-high speed with an electric mixer until light and fluffy, about 3 minutes. Scrape down the sides of the bowl, then add the vanilla and the 4 egg yolks, one at a time, beating a few seconds after each. Beat until smooth and light, about 1 minute. (Reserve the egg white.)

In a medium bowl, mix the flour, salt, and walnuts, then add the flour mixture to the egg mixture in 2 parts, mixing on low until just combined.

Divide the dough into 2 equal pieces. Put a piece of the dough into the prepared pan and press it out evenly on the bottom and up 1 1/2 inches on the sides. (If the dough is too soft to work with, wrap in plastic wrap and refrigerate for 10 to 20 minutes to slightly firm up.) Pile the cooled filling into the dough-lined pan.

On a lightly floured surface such as a cardboard disk or big piece of plastic wrap, press the remaining piece of dough into a round 9 or 10 inches in diameter, depending on the size of your springform pan. Slide the dough onto the filling and press it into place. This top crust should fit just inside the dough that extends up the sides of the pan and come all the way to its edges. Carefully seal the seam where the top joins the side dough, making sure the edges are straight and even.

Whip the reserved egg white in a small bowl until slightly frothy. Brush the top crust lightly with the egg white and poke the top with a fork in 5 places. Sprinkle with the sanding sugar.

Bake for 50 to 60 minutes, or until the crust is golden brown and the filling is bubbling out a bit. Cool to just slightly warm or room temperature before removing the pan sides. You might want to run a knife along the sides before unmolding. (When serving, be sure that the parchment paper is not stuck to the tart.)

To serve, slice the tart into 10 wedges. Place each wedge on a dessert plate. Top with a nice scoop of the semifreddo and garnish with a cranberry.

Cranberry Semifreddo
Makes about 10 servings

2 eggs, separated
1/2 cup fresh or frozen cranberries
2 tablespoons cranberry juice cocktail
1/2 cup granulated sugar
3 tablespoons mascarpone cheese
2 tablespoons superfine sugar
1/2 cup heavy whipping cream

Let the eggs come to room temperature while you proceed with the recipe.

Combine the cranberries, juice, and 1/4 cup of the granulated sugar in a small saucepan over medium-high heat. Cook until the cranberries pop, about 3 minutes. Remove from the heat, let cool, then purée until smooth.

In a medium stainless-steel bowl, whisk the egg yolks, remaining 1/4 cup granulated sugar, and cranberry purée. Set the bowl over a pan of simmering water, taking care that the bowl does not touch the water. Whisk until the mixture is thickened and hot—but be careful not to overcook (scramble) the egg mixture; this takes about 3 to 5 minutes. Remove from the heat and whisk in the mascarpone. Keep whisking until the mixture cools down, then refrigerate until thoroughly chilled.

Meanwhile, in a thoroughly clean and grease-free mediuim mixer bowl, whip the egg whites on high speed with an electric mixer until they just start to get frothy. Start sprinkling in the superfine sugar and whip until the whites are peaking. Gently fold the whipped egg whites into the chilled cranberry mixture.

Whip the cream until stiff, then gently fold it into the cranberry mixture, taking care not to lose volume.

Spoon the mixture into a 4-cup plastic container with a lid. Tap the container on a counter to release any bubbles, then smooth the top. Close the container, then place in a freezer for at least 8 hours, or until frozen.

Recipe from Kathy Casey’s Northwest Table Cookbook

Cranberry Citrus Vinaigrette
Makes 1 1/2 cups

2/3 cup fresh or frozen cranberries
1/4 cup sugar
1/2 cup white wine vinegar or distilled white vinegar
1 teaspoon Dijon mustard
1/4 cup orange juice
3/4 cup vegetable oil or light olive oil
1/4 teaspoon salt
1/4 teaspoon black pepper

Combine the cranberries, sugar, and vinegar in a small nonreactive saucepan and cook over medium heat until the cranberries pop, about 4 to 5 minutes. Remove from the heat and let cool.

Purée the mixture in a blender, then blend in the mustard and orange juice. With the machine running, gradually drizzle in the oil. The dressing should become smooth and emulsified. Blend in the salt and pepper. Refrigerate up to 3 weeks.

Recipe by Kathy Casey Food Studios®

Cranberries 1

Crimson Cranberry Sage Vinegar
Makes 6 cups

1 cup fresh or frozen cranberries
Fresh Sage
1 large shallot, peeled and quartered
6 cups white wine vinegar or distilled white vinegar
2 teaspoons sugar
1/2 teaspoon salt

Arrange the cranberries and shallot attractively in 2 clear glass wine bottles (you can skewer the cranberries, if you like, on long wooden skewers).

In a non-aluminum pan, bring the vinegar, sugar and salt to a boil. Immediately pour the liquid into the bottles, filling them 1 1/2 inches from the top. Let cool to room temperature, then cork. Let sit a minimum of 2 days before using. Store in a cool, dark place for up to 2 – 3 months, or refrigerate for up to 6 months.

Recipe by Kathy Casey Food Studios®

Posted by Kathy Casey on December 5th, 2019  |  Comments Off on Toast the Season with Cranberries |  Posted in dessert, Dishing with Kathy Casey Blog, Fruit, KOMO Radio, other, Recent Posts, Recipes

The Classic Upside Down Cake gets a Creative Spin

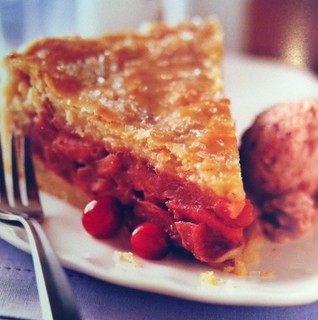
Not many desserts bring out a warm sense of old fashioned home cooking as much as an upside down cake. Think classic with those rings of pineapple, bright red cherries and oozy buttery brown sugar.

Upside down cakes are pretty straight forward: gooey sugary business on the bottom, topped with fruit then cake batter. Bake, flip and serve!

Pineapple Upside Down Cake
Here’s the Classic
! But we are going to get creative!

From peaches to pears to pineapple, almost any fruit can get the upside down treatment with this cake. And you can get creative with the cake batter too, like with my Spiced Pear Ginger Bread & Hazelnut Upside Down Cake, it’s unusual in several ways. For one thing, the cake layer is a gingerbread batter. For another, it’s baked in a Bundt pan. And it’s highly spiced and aromatic — ginger along with cloves, nutmeg and lots of cinnamon. And did I mention the cake’s enriched with hazelnuts?

Or for a morning treat how about a Breakfast Oatmeal Apple Upside Down Cake. This moist cake is not too sweet and is a real treat for a weekend brunch. My testing and tasting team even liked it topped with a pouf of yogurt.

If sweets aren’t your thing, try my Savory Onion Upside Down Cake made with caramelized onions, fresh thyme, baked up with an olive oil and herb studded quick bread topping. Perfect along with a green salad or a hearty bowl of homemade soup!

So, consider upside down cakes for your next breakfast, supper or dessert. –Kathy

Spiced Pear Gingerbread Hazelnut Upside Down Cake
Makes 1 Bundt cake, serving 10 to 12

Pears
1 Tbsp butter
2 cups 1/2-inch-diced, firm, ripe pear with skin, cored (about 2 pears or one very large pear)
1/4 cup granulated sugar
1 tsp ground cinnamon

Batter
3/4 cup boiling water
3/4 cup molasses
1/2 tsp baking soda
2 cups flour
1/8 tsp ground cloves
1 1/2 tsp ground cinnamon
3/8 tsp ground nutmeg
3/4 tsp ground ginger
1/2 tsp salt
2 1/4 tsp baking powder
6 Tbsp (3/4 stick) unsalted butter
3/4 cup sugar
1 egg
1 1/2 tsp very finely minced fresh ginger
1/2 cup chopped hazelnuts

Preheat oven to 350 degrees F.

To prepare the pears: In a 10-inch skillet, melt 1 tablespoon butter over medium high heat. Add the diced pears, 1/4 cup sugar, and 1 teaspoon cinnamon to the pan. Sauté for 3 to 4 minutes, until the pears are slightly caramelized and somewhat soft. Spoon mixture into the bottom of a 10-cup, non-stick Bundt pan.

To make the cake batter: In a medium bowl combine the boiling water, molasses, and baking soda. Set aside.

In a separate bowl, combine the flour, dry spices, salt and baking powder, and mix well. Set aside.

In a large mixing bowl, beat together the butter and sugar until fluffy. Add the egg and fresh ginger, and mix well. Add molasses mixture and reserved dry ingredients, alternately, beginning and ending with the liquid, and mixing after each addition. Finally, add the chopped hazelnuts.

Spoon batter gently into Bundt pan over the pears and then lightly rap pan on counter to release any bubbles. Bake in preheated oven for 20 to 30 minutes, or until cake tests done. (When done, cake may not entirely fill the Bundt pan. Don’t worry; this is normal for this recipe.)

Cool to room temperature before inverting.

Recipe © Kathy Casey Food Studios®.

Breakfast Oatmeal Apple Upside Down Cake
Makes 1 10-inch round cake, serving 8 to 10

Batter
2/3 cup rolled oats
1/2 cup golden raisins
3/4 tsp ground cinnamon
1/4 tsp ground nutmeg
1 cup boiling water
2/3 cup, packed, brown sugar
2/3 cup granulated sugar
1 egg
1/3 cup vegetable oil
1 cup flour
3/4 tsp baking soda
1/4 tsp salt

Apple layer
1 Tbsp brown sugar
1 Tbsp flour
1/2 cup chopped pecans
1 Gala apple, cored, skin on, sliced in thin wedges
—————————–
vanilla yogurt (optional)

Preheat oven to 350 degrees F. Spray a 10-inch round cake pan with vegetable cooking spray, and set aside.

Mix oats, raisins, cinnamon and nutmeg in a heat-proof container, and pour measured boiling water over mixture. Let sit for 15 minutes.

Meanwhile, prepare the apple layer: In a small bowl, mix together the 1 tablespoon brown sugar, 1 tablespoon flour, and the pecans, and pat out into the bottom of the cake pan. Then lay the apple slices out evenly on the brown sugar mixture. Set aside.

In a large bowl, combine the 2/3 cup brown sugar, granulated sugar, egg, and oil, and mix well. In a small bowl, mix together the 1 cup flour, soda and salt, then add to sugar mixture. Add plumped oat mixture and stir well.

Without disturbing the apple layer, add batter into the cake pan carefully, and then lightly rap pan on counter to release any bubbles. Bake in preheated oven for 35 to 40 minutes, or until cake tests done.

Let sit 5 minutes after coming out of the oven, loosen sides of cake from pan with a table knife, and then immediately invert cake onto a large plate.

Serve warm or at room temperature, topped with dollops of vanilla yogurt if desired.

Recipe © Kathy Casey Food Studios®.

Savory Caramelized Onion Upside Down Quick Bread
Makes 1 10-inch savory cake, about 8 servings

Onion layer
1 Tbsp olive oil
1/2 tsp butter
2 large white onions, peeled and cut into 1/2-inch rounds
1/2 cup garlic cloves, halved
2 sprigs fresh thyme
1 bay leaf
1/4 tsp salt
1 Tbsp white wine
1 Tbsp red wine vinegar

Batter
2 cups flour
3 Tbsp sugar
1 Tbsp baking powder
1 tsp salt
1/2 cup olive oil
3/4 cup whole milk
2 eggs
1 Tbsp chopped fresh chives
1 Tbsp chopped fresh parsley

Preheat oven to 350 degrees F.

To prepare the onions: In a 10-inch skillet, heat olive oil and butter together over medium heat. Add onions, garlic, thyme and bay leaf. Cover, and cook over medium-low heat for 15 minutes. Stir in 1/4 tsp salt, wine and vinegar, and continue cooking, covered, for another 15 to 20 minutes until golden brown and very soft. Set aside in pan and cool to room temperature. Remove thyme stems and bay leaf. (You will be adding the cake batter to this pan.)

To make the batter: In a large bowl, combine and mix flour, sugar, baking powder and salt. Add remaining ingredients, and mix till just combined.

Spoon batter over onion mixture in the pan and bake in preheated oven for 35 to 40 minutes, or until quick bread layer tests done.

Remove from oven. Run a knife around edge, carefully invert hot skillet onto a large serving plate, and remove skillet. Any onion mixture remaining in pan can be scraped out with a spatula and spread on quick bread.

Recipe © Kathy Casey Food Studios®.

Posted by Kathy Casey on October 3rd, 2019  |  Comments Off on The Classic Upside Down Cake gets a Creative Spin |  Posted in breakfast, dessert, Dishing with Kathy Casey Blog, Foodie News, Fruit, KOMO Radio, Recent Posts, Recipes, sides

Taco Party

DIY hands-on dinner parties are always fun, interactive and convenient when it comes to dietary restrictions and preferences. It’s also a great way to answer that age old party question, “What can I do to help?”

One of my fave kinds of food parties is a taco fiesta! You can offer a variety of meat and vegetarian options, such as slow cooked chili-pork to ginger-lime marinated chicken and cumin grilled squash. Or go coastal and grill up some shrimp or Alaska cod filets! For your veggie friends, be sure to have slow simmered garlicky black beans or cilantro studded quinoa.

Set out a variety of cheeses like queso fresco, feta, or goat cheese and lots of fresh salsas from red to green to tropical (think diced mango & pineapples, etc.). Offer up soft flour tortillas and corn tortillas for the gluten free gang.

Pickly or crunchy add ins like my Red Onion Escabeche Veggies or shaved green cabbage are a must and are great to top my Chili & Lime Slow Cooked Pork tacos.

And don’t forget to serve it all up with a cool pitcher of margaritas, chilled beers and Sparkling Limeade!

So get your fiesta on with friends and make your next get together a DIY taco party! –Kathy

KC tacos

Yum!
Photo from
Kathy Casey’s Northwest Table.

Chili & Lime Slow-Cooked Pork with Red Onion Escabeche and Warm Tortillas
Makes 6 hearty servings

Pork
1/4 cup chili powder
1 tablespoon coriander seed, crushed
1 tablespoon salt
1 boneless pork butt (shoulder), about 3 pounds, cut into 2 pieces
2 large tomatoes, chopped
4 cloves garlic, sliced
1/4 cup fresh lime juice

Escabeche
2 large carrots, julienned
1 large red onion, thinly sliced
1/2 cup fresh lime juice
2 tablespoons corn or other vegetable oil
1/2 cup coarsely chopped fresh cilantro (about 1 bunch)
1 teaspoon salt

Accompaniments
Warm corn tortillas
Sour cream
Salsa or freshly made pico de gallo
Queso fresco (Mexican-style fresh cheese)
Fresh cilantro sprigs
Lime wedges

To prepare the pork, mix the chili powder, coriander seed, and salt in a large, shallow bowl. Roll the pork in the mixture, taking up all the seasoning.

Put the pork in a slow-cooker, add the remaining ingredients, and set the cooker on high. Let cook for 8 hours—or up to 10 hours if you’re still at work!

When ready to serve, mix the escabeche ingredients well, then place in a serving dish. Shred the pork and place in a large serving bowl with some of the cooking liquid.

Serve the pork with the escabeche and accompaniments. Diners build their own “soft tacos,” then squeeze lime juice over the filling before folding.

Chef’s Note: To heat tortillas, place them, one by one, on a dry skillet over medium-high heat and turn frequently. As they are heated, slip them between the folds of a clean dish towel or cloth napkin. Wrap the towel in foil (or put into a small casserole dish and cover) to steam in their own heat and moisture. Or, microwave the tortillas very briefly and put into a napkin as above. Or, wrap several tortillas in a foil packet and steam them in a steamer until just heated through; use directly from the foil or wrap in a towel as described above.

Recipe from Kathy Casey’s Northwest Table.

Sparkling Limeade

Sparkling Limeade

3 Tbsp. finely minced lime zest (with no white pith)
2 cups sugar
2 cups water
——————————————————
1 1/2 cup fresh-squeezed lime juice
3 cups chilled sparkling water
Garnish: long fresh lemon and lime zest twists

Combine the zest, sugar and water in a small saucepan. Bring to a quick boil over high heat. Boil for 1 minute then remove from heat and let cool.

In a large pitcher combine the cooled sugar syrup, lime juice and the sparkling water.
Serve over ice and garnish with citrus twists.

Photo and recipe by Kathy Casey Liquid Kitchen®.

Posted by Kathy Casey on May 2nd, 2019  |  Comments Off on Taco Party |  Posted in Dishing with Kathy Casey Blog, Foodie News, KOMO Radio, Lifestyle, meats, Recent Posts, Recipes, sides

Tasty Garden Rocket: Arugula!

Ah, arugula! This bold green livens up any dish it’s in. Nicknamed “Garden Rocket,” it grows fast, almost like a weed in our northwest climate.

Well, weed or not, this tasty leaf is full of great health benefits. Just 4 ounces of this green is just 25 calories – wow! It’s also full of vital antioxidants and vitamins – 3 cups gives you 100% of your daily vitamin K needs!

Arugla’s taste is nutty and peppery. Try it tucked into sandwiches, or tossed in a little olive oil and scattered over a sexy cheese pizza. This tasty green also complements meat and seafood beautifully. It makes a perfect bed for a piece of grilled fish or steak.

Of course, it’s great in salads like in my Baby Arugula, Orange & Fennel Salad with Grilled Shrimp & White Balsamic Vinaigrette. It’s also a delicious add-in to a homemade pesto recipe for a robust, peppery edge!

So get your arugula on and dig into this peppery green that’s so good for you! – Kathy

Baby Arugula Salad
Photo from Kathy Casey’s Northwest Table, Chronicle Books.

Baby Arugula, Orange & Fennel Salad with Grilled Shrimp and White Balsamic Vinaigrette
Makes 6 to 8 servings

Shrimp
1 Tbsp undiluted orange juice concentrate
Pinch of red pepper flakes
2 Tbsp minced orange zest
1 Tbsp Dijon mustard
2 Tbsp minced shallots
1/2 cup olive oil
2 Tbsp minced fennel fronds
1 Tbsp fennel seed, toasted and crushed
2 1/2 tsp kosher salt
1/2 tsp black pepper
2 lbs large raw shrimp (32 to 40)

Salad
1 large or 2 small fennel bulbs, trimmed
6 oranges or tangerines
6 cups baby arugula
2 heads baby frisée, torn, rinsed and spun dry
White Balsamic Vinaigrette (recipe follows)

To marinate the shrimp, whisk all the ingredients, except the shrimp, in a large bowl. Peel, devein, and remove tails of the shrimp then add them to the marinade and toss to coat. Refrigerate and marinate for at least 1 hour or overnight.

To prepare the salad, finely shave the fennel bulbs with a sharp knife or a mandoline and crisp in ice water for 10 minutes. Spin dry before using. Cut the peel off the oranges, trim away all the white pith, then cut the fruit into 1/4-inch-thick slices. Flick out any seeds. (If prepared ahead, refrigerate the fennel and orange slices separately, for up to 2 hours.)

Prepare a hot fire in a charcoal grill, or preheat a gas grill to high. Grill the shrimp until just pink and done, about 1 to 2 minutes per side.

Meanwhile, toss the arugula, frisée, fennel, and oranges with enough of the vinaigrette to coat nicely—taste for flavor, adding more dressing if needed.

Serve the salad on a large platter or divide among individual plates, arrange the shrimp on top, and drizzle with a little extra dressing, if desired.

White Balsamic Vinaigrette
The vinaigrette keeps, refrigerated, for up to 2 weeks.

Makes 2 cups

1/2 cup white balsamic vinegar
2 Tbsp minced shallots
1 1/2 tsp Dijon mustard
1/4 cup undiluted orange juice concentrate
Pinch of red pepper flakes, or 1 Tbsp harissa paste
2 tsp kosher salt
Freshly ground black pepper
1 Tbsp fennel seed, toasted and ground
1 cup extra-virgin olive oil
1 Tbsp chopped fennel fronds

In a large bowl, whisk the vinegar, shallots, mustard, and juice concentrate. Whisk in the pepper flakes, salt, pepper to taste, and fennel seed. Slowly drizzle in the oil, whisking constantly to emulsify. Stir in the fennel fronds. If made ahead, refrigerate until shortly before needed, then rewhisk before using.

Recipe from Kathy Casey’s Northwest Table, Chronicle Books.

Posted by Kathy Casey on March 21st, 2019  |  Comments Off on Tasty Garden Rocket: Arugula! |  Posted in Books to Cook, Dishing with Kathy Casey Blog, KOMO Radio, Recent Posts, Recipes, salads, seafood, sides

Spaghetti Squash Is More Than Just A Pasta Plant


Most people have had a hand at cooking spaghetti squash, and there are a lot of ways to prepare this tasty vegetable.

This winter squash starts getting popular at the farmers market and grocery store in early fall. The cooked stringy flesh is delicious, but there are a few cooking tricks to know.


Cut the squash in half length-wise. Make sure to use a good knife and a little muscle – this is a sturdy squash! Once you have the squash in half, scrape out the seeds and pulp the same way you would with any other winter squash.

Turn the halves cut-side down in a baking dish. Add a little water and roast in a 350 degree oven

for about an hour. You’ll know it’s done when a fork slides in and out of the flesh easily. If you’re in a hurry you can quick cook it the same way in the microwave in a glass dish – just blast on high until fork tender.


Now to get those noodle-like strands out of the shell. Turn the squash up and gently scrape the flesh with a fork along the grain and loosen it up. Then scoop the squash into a bowl and finish how you like.


It’s a great low-calorie and gluten-free option to traditional pasta for topping with marinara. Or toss it with maple syrup or honey, a little butter or olive oil, some minced fresh herbs and some sea salt for a great side dish to any entrée. –Kathy

Posted by Kathy Casey on October 4th, 2018  |  Comments Off on Spaghetti Squash Is More Than Just A Pasta Plant |  Posted in Dishing with Kathy Casey Blog, Foodie News, KOMO Radio, Lifestyle, Recent Posts

Huckleberries – A taste of Late Summer

It’s time to talk about huckleberries. This native Pacific Northwest berry is delicious in drinks, desserts, incorporated into dinners, or straight off the bush!

huckleberries
Photo from The Daily Apple

There are lots of places you can pick huckleberries and often you can get some great hiking in, too. Find a trail in the mountains that takes you roughly above 2,000 feet; huckleberries grow fine at sea-level, but really go wild in higher elevations. Look for bushes in meadows or along lakes. The Washington Trails Association has a great list of “huckleberry hikes.”

Just remember these 2 key pointers:

  1. Lots of berries grow in our neck of the woods, and not all of them are edible. Make sure to take a guidebook along to make sure you’re picking the right ones.
  2. Keep your eyes open for roaming animals. Our wildlife loves huckleberries as much as we do; you might even spot a bear so be careful!

And they’re not just for pie although I love them studded into an apple pie like in my Apple Huckleberry Pie with Spiced Crust.

One of my favorites is a savory Pan Seared Chicken Breast with Huckleberries, Blue Cheese & Port Sauce. Or how about roasted with slices of sweet potato – yum!

These wild fall berries are delicious in almost anything! –Kathy

Apple Huckleberry Pie with Spiced Crust
Makes 1 9-inch pie

Crust
2 cups flour
2 tsp sugar
1/4 tsp salt
1/2 tsp round nutmeg
1/2 cup graham cracker crumbs
12 Tbsps (1 1/2 sticks) cold butter, cut into small pieces
6 Tbsps ice water

Filling
1 cup sugar
3/4 tsp ground cinnamon
1/4 tsp ground nutmeg
3 Tbsps flour
2 Tbsps cornstarch
7 cups 1/8- to 1/4-inch-sliced, peeled and cored apples (about 2 to 2 1/2 pounds)
1 cup fresh wild huckleberries
milk and sugar for topping (optional)

To make the crust:In a large bowl, combine flour, sugar, salt, nutmeg and graham cracker crumbs and mix evenly. Cut in butter until particles are pea-sized. Sprinkle in cold water, 1 tablespoon at a time, and mix with a fork just until dough comes together in a ball. Do not overmix dough. (If dough is too soft to handle, press gently into 2 disks and refrigerate for about 20 minutes.)

Divide dough into 2 pieces and press gently into disks. Refrigerate for about 10 – 15 minutes while you make the filling.

To make the filling: In a large bowl, toss together the sugar, cinnamon, nutmeg, flour, cornstarch, apples and huckleberries. Set aside.

Preheat oven to 425 degrees F.

Remove dough from the fridge and, on a lightly floured surface, roll dough out into 2 rounds, each about 12 inches in diameter. Brush excess flour from one crust, then gently roll up crust onto rolling pin. Unroll into pie pan and press/fit bottom crust into pan. Trim dough overhang to 1/2″.

Mound the fruit mixture evenly into pastry-lined pie pan. Brush edges of bottom crust lightly with water and then cover pie with top crust. Trim top crust overhang to 1 inch, then fold overhanging top-crust dough under edge of bottom crust overhang and tuck excess dough under, even with edge of pan. Seal and flute edges with fingertips to make a pretty crimp. Make several slits on the top to allow steam to escape. For a shiny, sugary top, brush top crust lightly with milk then sprinkle with granulated sugar.

Bake for 10 minutes at 425, then reduce the heat to 375 degrees and bake for about 50 minutes more, or until crust is nicely browned and apples are cooked through.

Recipe by Kathy Casey Food Studios®.

Pan-Seared Chicken Breast with Huckleberries, Blue Cheese & Port Sauce
Makes 4 servings

4 boneless, skinless chicken breast halves
kosher salt
freshly ground black pepper
1 Tbsp clarified butter or olive oil plus more if needed
1 shallot, minced
2 large fresh sage leaves
3/4 cup port
1 Tbsp Dijon mustard
1/2 cup chicken broth
1/4 cup heavy whipping cream
1/2 cup crumbled Oregon blue cheese or other full-flavored blue cheese (about 2 ounces)
1/4 cup fresh wild huckleberries

Garnishes:
fresh sage leaves
crumbled blue cheese
fresh wild huckleberries

Read through the entire recipe before beginning, and have all ingredients ready within reach of the range.

Preheat oven to 400 degrees F. Season chicken liberally on each side with salt and pepper. (If chicken breasts are really large, then lightly pound out a bit between sheets of plastic wrap.)

In a large, heavy, ovenproof nonstick skillet or sauté pan, heat the clarified butter over high heat until hot. Sear the chicken breasts for about 4 minutes on each side, or until golden brown.

Transfer the skillet to the oven and cook the chicken for about 10 to 12 minutes, or until juices run clear. Remove the pan from the oven, transfer chicken to a plate and keep warm.

Place the chicken-cooking pan over high heat and add the shallot and sage leaves to the pan. Cook for about 30 seconds, then stir in the port and mustard and scrape up the browned bits in the bottom of the pan to get all that good flavor into the sauce. Continuing cooking on high heat to reduce the port to 1/4 cup, about 1 1/2 minutes. Whisk in the chicken broth and cream, and reduce until saucy and almost glossy, about 4 minutes. Add the cheese and whisk in for about 30 seconds to 1 minute, then remove the sauce from heat and stir in the huckleberries.

Discard the sage leaves. Whisk in any accumulated juices from the resting chicken breasts, taste the sauce, and adjust the seasoning with salt and pepper if needed.

To serve, plate the chicken breasts on dinner plates and drizzle with the sauce, dividing evenly. Garnish with fresh sage leaves and a sprinkling of cheese and huckleberries.

Recipe by Kathy Casey Food Studios®.

Posted by Kathy Casey on September 21st, 2016  |  Comments Off on Huckleberries – A taste of Late Summer |  Posted in Restaurants, Cocktails, dessert, Dishing with Kathy Casey Blog, Foodie News, Fruit, KOMO Radio, Lifestyle, poultry, Recent Posts, Recipes
Untitled